Privileged account credentials are prized by cybercriminals because they provide extensive access to high value assets within a network. Restricting privileged access to only users with a demonstrated business need is essential to protecting your environment.
Before you begin
Review the Small business cloud security guides introduction before you use this technical example. The introduction includes steps you should take before you begin, including:
- Check that you have a compatible Microsoft 365 subscription. This technical example requires a subscription to Microsoft 365 Business Premium (or equivalent). A limited number of administrators will require an Azure Active Directory Premium P2 licence (or higher) to use Microsoft’s Privileged Identity Management functionality.
- Enable security defaults in Azure Active Directory. Microsoft has published guidance on enabling Security defaults.
- Enrol your compatible devices in Intune. Microsoft has published guidance on enrolling Windows devices in Intune.
The steps taken in this technical example require an account with Privileged Role Administrator or Global Administrator privileges.
Why you should restrict administrator privileges
Privileged account credentials are prized by cybercriminals because they provide extensive access to high value assets within a network. Restricting privileged access to only users with a demonstrated business need is essential to protecting your environment. The fewer privileged accounts in your environment, the fewer opportunities there are for cyber criminals to obtain privileged account credentials. Separating privileged accounts from standard accounts can reduce the risk of privilege escalation. Furthermore, restricting access to the internet, email and web services can prevent common attacks, such as drive-by compromise, affecting privileged accounts.
Your environment can be further protected by limiting how privileged accounts can be used. Implementing a separate and restricted operating environment for privileged accounts can reduce their attack surface and protect them from being compromised. Providing narrowly-scoped and time-bound privileges to administrator accounts increases the difficulty for an adversary to undertake malicious activities using compromised accounts.
Requirements for restrict administrative privileges
This technical example is adapted from Essential Eight maturity level one. It is designed to meet the following requirements:
- Requests for privileged access to systems and applications are validated when first requested.
- Privileged accounts (excluding privileged service accounts) are prevented from accessing the internet, email and web services.
- Privileged users use separate privileged and unprivileged operating environments.
- Unprivileged accounts cannot logon to privileged operating environments.
- Privileged accounts (excluding local administrator accounts) cannot logon to unprivileged operating environments.
What this technical example covers
This technical example demonstrates one way to restrict administrator privileges in Microsoft 365. The technical example uses Microsoft’s Privileged Identity Management and recommends that trusted administrators provide time-bound privileged roles to users with a demonstrated need.
This technical example also includes guidance on separating operating environments for privileged and unprivileged accounts, for example, through a locked-down secondary device for administrative access.
Technical Example
Enabling a user to apply for privileged access
This technical example limits the number of users with administrative privileges by requiring users to request privileged roles. Privileged roles can be granted at the user or group level. The following steps may be taken by your tenancy administrator.
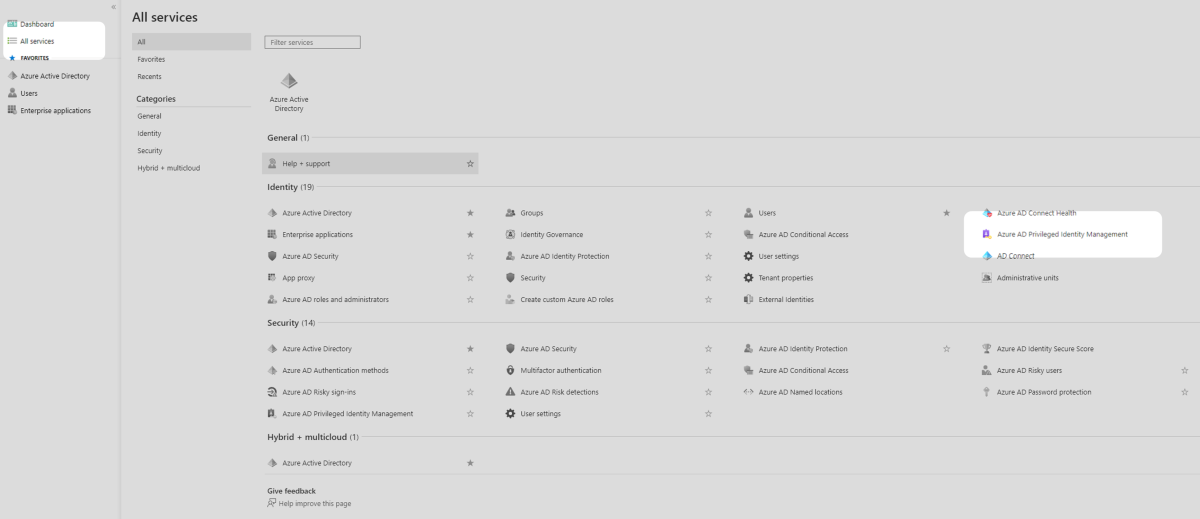
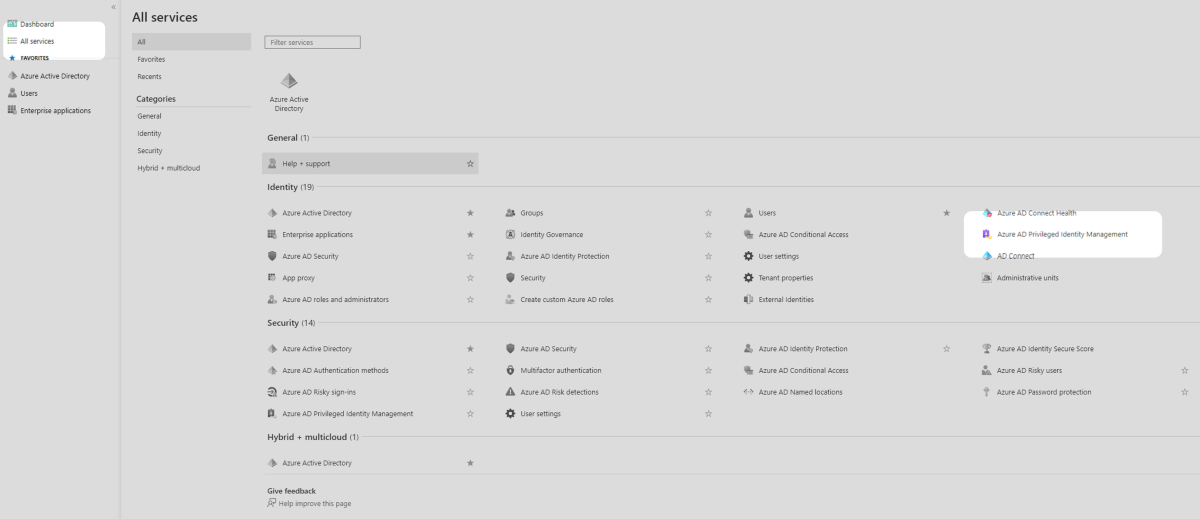
1. From the Azure Active Directory admin center, navigate to All services then select Azure AD Privileged Identity Management.
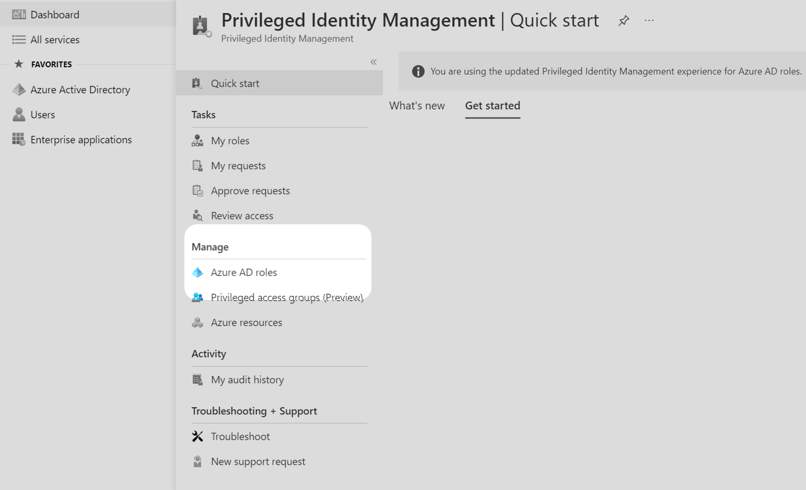
2. In the new window, under the Manage menu options, select Azure AD Roles.
3. Select Roles and review the list of roles. Consider which of these are necessary for your organisation and select one to follow along with this example. The Authentication Administrator role is used in this technical example. Your organisation will need to follow the subsequent steps for all administrator roles it requires.
Note: This technical example recommends managing administrator roles with just-in-time access. This restricts the amount of time a user holds administrator privileges by only providing time-bound escalation of their privileges on request. The organisation in this technical example has a permanent Privileged Role Administrator, all other privileged roles are managed with just-in-time access, including Global Administrator, Authentication Administrator and Application Administrator.
It’s also good practice to create ‘break-glass’ accounts with credentials stored in a secure offline location. To achieve this consider following existing Microsoft guidance.

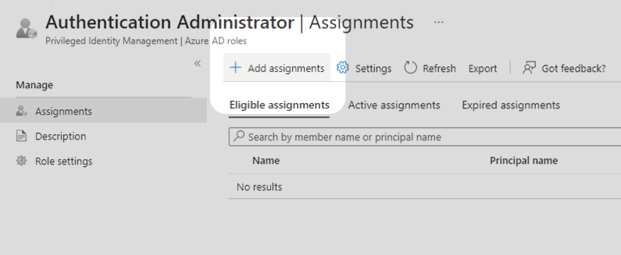
4. Choose Add Assignments in the Authentication Administrator page.
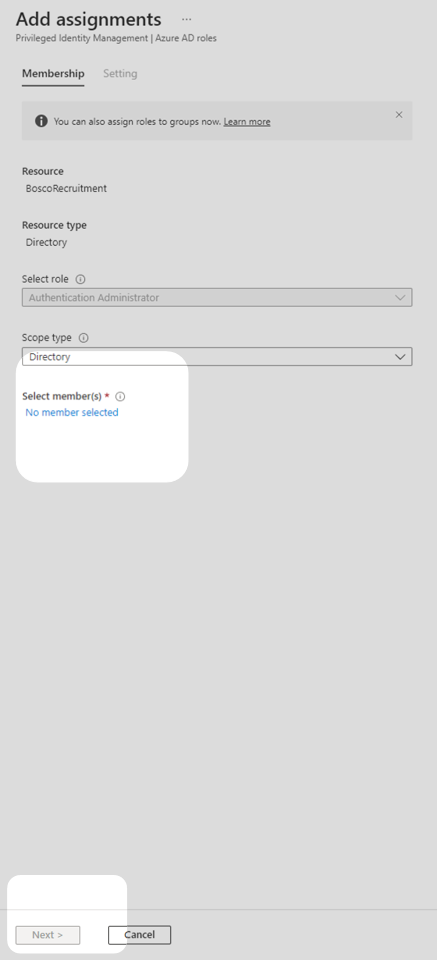
5. Leave settings as default and select No member selected under the Select member(s) heading. In the Select a member pane, choose users to become authentication administrators, press Select, then press Next. Only groups which were enabled with Azure AD role assignment can be selected.
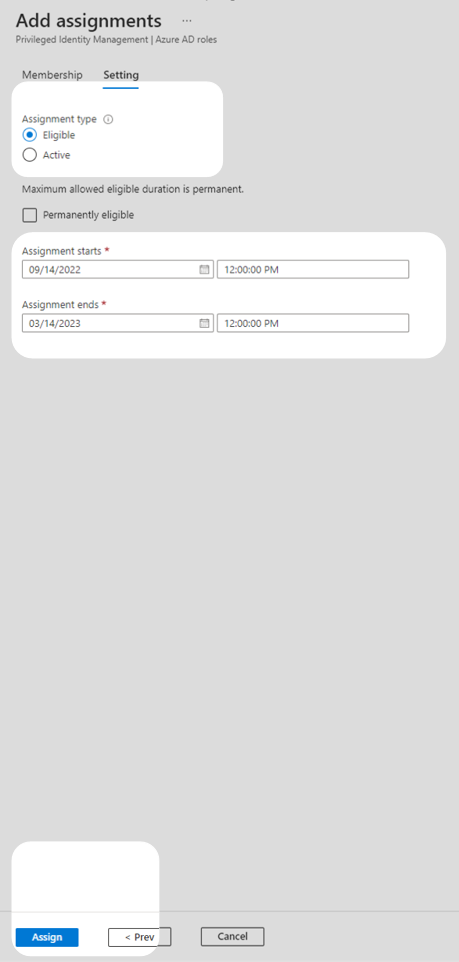
6. Ensure that Assignment type is set to Eligible and consider the duration of this assignment. Once this assignment ends, selected users will no longer be able to apply for the privileged role. After inputting an assignment duration, select Assign, you will be directed to the Authentication Administrator page.
Note: Setting the assignment type to Eligible allows the user to request just-in-time access to the Authentication Administrator role. Setting the assignment type to Active assigns the Authentication Administrator role to the user without the protection of just-in-time privileged access. The Eligible assignment type is used in this technical example to take advantage of the security benefits of limiting the time that users can access administrator roles.
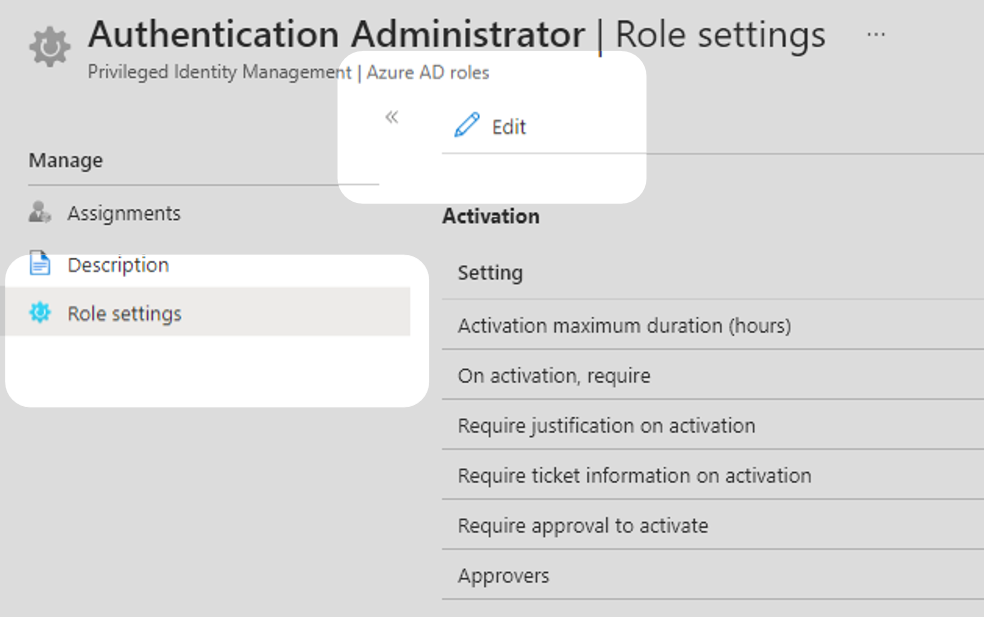
7. In the left hand menu on the Authentication Administrator page, select Role settings and select Edit
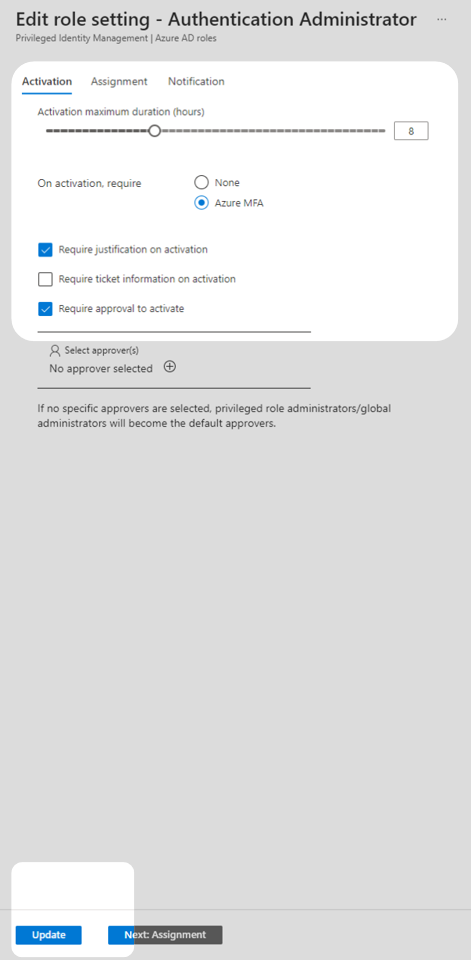
8. On the Edit role setting page ensure that Require approval to activate is enabled. This prevents users from being able to gain access to the privileged role without administrator intervention.
Azure MFA should also be required on activation to align with this publication’s Multifactor Authentication guidance.
Set the Activation maximum duration in accordance with your organisation’s business needs. In this technical example the duration is set to eight hours.
Consider which members of your organisation can approve requests for privileged access. In this technical example, the Select approver(s) field is left blank which makes privileged role administrators and global administrators the default approvers.
Press Update to save these changes. The role is now ready for users to request access.
Applying for Privileged Access
1. From the unprivileged user account, navigate to portal.azure.com, open More services, and then open Azure AD Privileged Identity Management.
2. Select My roles from the menu.
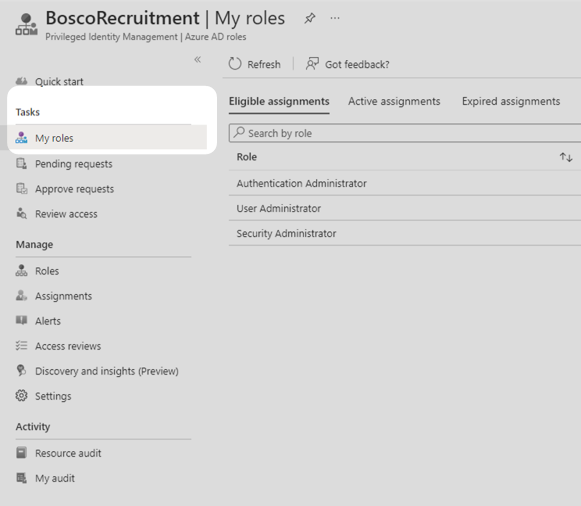
3. Review the list of roles the user is eligible to activate. Select Activate on the required role.

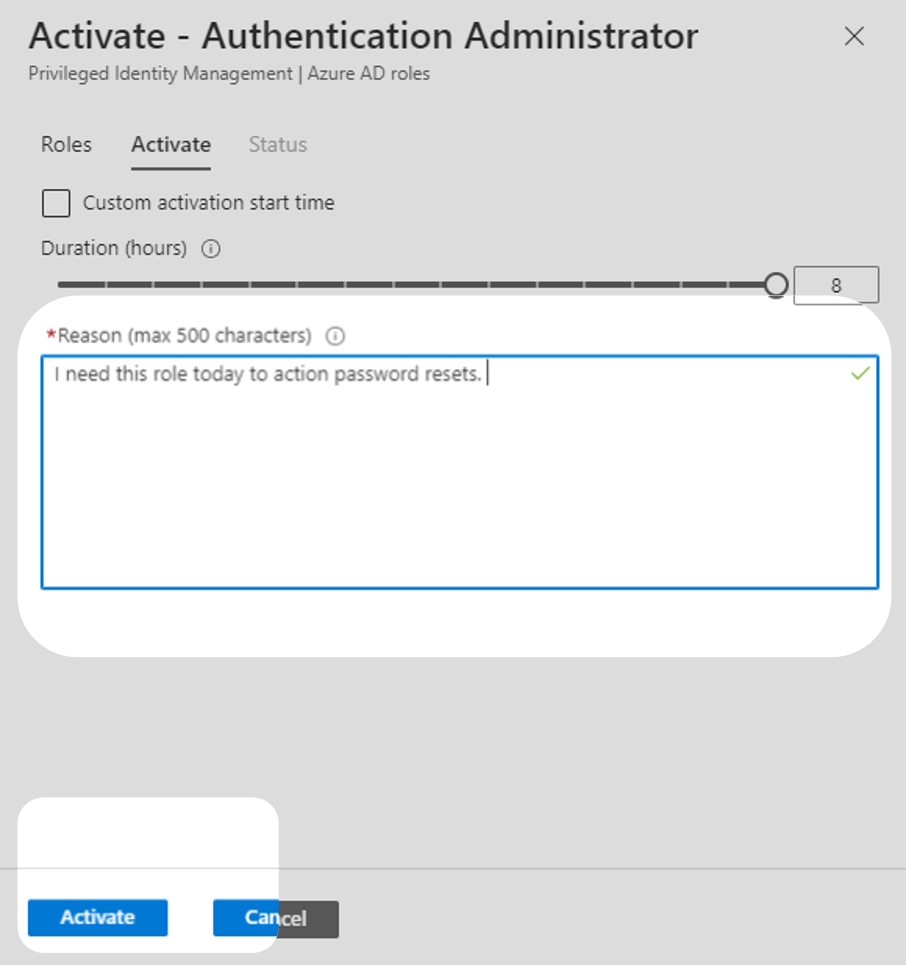
4. A context window will open for the role. Fill in the justification field with a reason and press Activate. This will notify the approver via email that you have requested access. The user will gain the privileged role after the approver validates and approves the request.
Note: In this technical example, role settings were configured to require MFA before they are activated. Ensure that the requesting user has MFA enabled before they attempt to activate a role.
Creating a separate operating environment for privileged users
Creating a separate operating environment for privileged users will further protect privileged user accounts. There are many ways to achieve separation between operating environments. Consider following guidance published by Microsoft on creating privileged access workstations, configured such that they cannot access the internet, email or web services.
To take advantage of separate operating environments, administrators should manage two accounts:
- An administrator account that is only used on the privileged access workstation.
- A standard user account that is used on a standard workstation for any tasks that do not require special privileges.
